Webzstore
Learn how to Configure My Email Client with Rackspace Mailbox using IMAP/SMTP. Set up on the Gmail app, Outlook, iOS Mail, Thunderbird, & more.
Want to access your Rackspace email through the Gmail app, Outlook, Thunderbird, or iOS Mail?
This guide walks you through the complete setup process using secure IMAP and SMTP settings.
Whether you're setting up for the first time or troubleshooting connection issues, you’ll learn how to easily configure your email client, send and receive messages, and ensure proper syncing with your Rackspace mailbox.
TL;DR? Read the summary of this article:
- Find your IMAP/SMTP settings – Use these standard settings for any email client:
- Incoming (IMAP): secure.emailsrvr.com, port 993, SSL/TLS
- Outgoing (SMTP): secure.emailsrvr.com, port 465, SSL/TLS
- Configure your email client – Enter your name, email address, password, and the server details in apps like Outlook, Thunderbird, or iOS Mail.
- Enable SMTP authentication – Make sure “My outgoing server requires authentication” is selected and uses the same login details as your incoming server.
- Test and sync – Send a test email to confirm everything works, and allow time for your inbox to sync all messages.
How to Configure My Email Client with Rackspace Mailbox?
You can access your Rackspace mailbox through any email client of your choice, such as the Gmail app, Outlook, Thunderbird, or iOS Mail. While using an email client is optional—you can always log in via Rackspace Webmail—it offers more convenience for day-to-day communication.
This guide uses the IMAP protocol to configure your mailbox, allowing you to sync messages across multiple devices while keeping a copy stored securely on Rackspace servers.
Default IMAP Settings
Your Name: Your Name or Business Name
Login Name: Your Rackspace Mailbox Email Address
Password: Your Rackspace Mailbox Password
Account Type: IMAP
Incoming Mail Server: secure.emailsrvr.com
Outgoing Mail Server: secure.emailsrvr.com
Incoming Mail Server (IMAP) TCP Port: 993 (SSL)
Outgoing Mail Server (SMTP) TCP Port: 465 (SSL)
Gmail
Checked 3 October 2026 against Google's Gmail Help. Google has announced changes that affect how Gmail works with other providers' mailboxes, so the older "Check mail from other accounts" (POP) method on the Gmail website is no longer the setup to follow:
- Gmail will no longer support checking mail from third-party accounts through POP. After the first quarter of 2026, that feature no longer supports new users, and existing users can keep using it until January 2027.
- Google's Gmail Help also says that from January 2027 Gmail will no longer support the "Send as" feature for third-party email addresses (addresses that are not Google Workspace aliases or other Gmail addresses you own). That means a Rackspace address cannot be relied on as a "Send mail as" address in Gmail on a computer.
If you already use Gmail to fetch Rackspace mail through POP, it keeps working only until Google ends support in January 2027, so plan a change before then. Messages already imported stay in Gmail. For a new setup, use one of the supported options below.
Option 1: Add your Rackspace mailbox to the Gmail app (IMAP)
Google says you can read and send mail from another account in the Gmail app for Android, iPhone and iPad, which uses a standard IMAP connection. On your phone or tablet:
- Open the Gmail app and tap your profile picture.
- Tap Add another account and choose Other (IMAP).
- Enter your Rackspace email address and tap Next.
- Enter the incoming (IMAP) settings from the Default IMAP Settings section above: server
secure.emailsrvr.com, port993, security SSL/TLS, with your full email address as the username. - Enter the outgoing (SMTP) settings: server
secure.emailsrvr.com, port465, SSL/TLS, with your full email address as the username and the same password. - Follow the remaining prompts to finish linking the account.
The exact labels in the app can change between versions. If the app asks you to verify your identity, follow its prompts.
Option 2: Forward Rackspace mail to Gmail
Google also suggests setting up automatic forwarding with your other email provider, so new messages arrive in your Gmail inbox. You would set this up on the Rackspace side, in your Rackspace Email control panel or with Rackspace support, not in Gmail. Forwarding delivers copies of new incoming messages only. It does not let you send from your Rackspace address inside Gmail on a computer, and you should check how your forwarding handles spam and replies before you rely on it.
If you prefer a desktop program, use a full email client such as Outlook or Thunderbird (sections below) with the IMAP settings above.
Windows Mail and Outlook for Windows
The Windows Mail app is no longer a current option. Microsoft states that support for Windows Mail, Calendar and People ended on 31 December 2024 (checked 3 October 2026), and recommends new Outlook for Windows instead. This guide therefore no longer walks through Windows Mail.
To add your Rackspace mailbox to new Outlook for Windows, open Settings, go to Accounts and then Your accounts, choose Add account under Email accounts, enter your Rackspace email address and select Continue. If Outlook cannot detect the server automatically, use its advanced or manual option and enter the IMAP and SMTP settings from the Default IMAP Settings section. Menu wording differs between Outlook versions, so follow Microsoft's current help for the version you use.
Microsoft Outlook
- Launch Microsoft Outlook. In this demonstration, we are using Microsoft Outlook 2016. Menus and wording differ in newer versions of classic Outlook, but the server settings are the same.
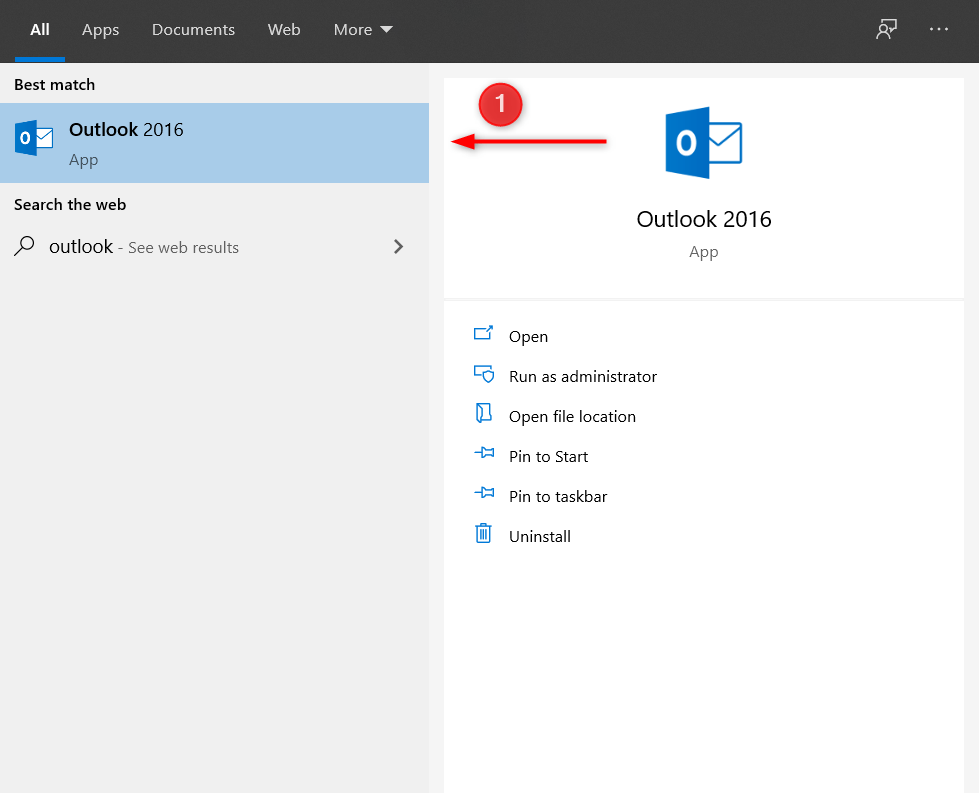
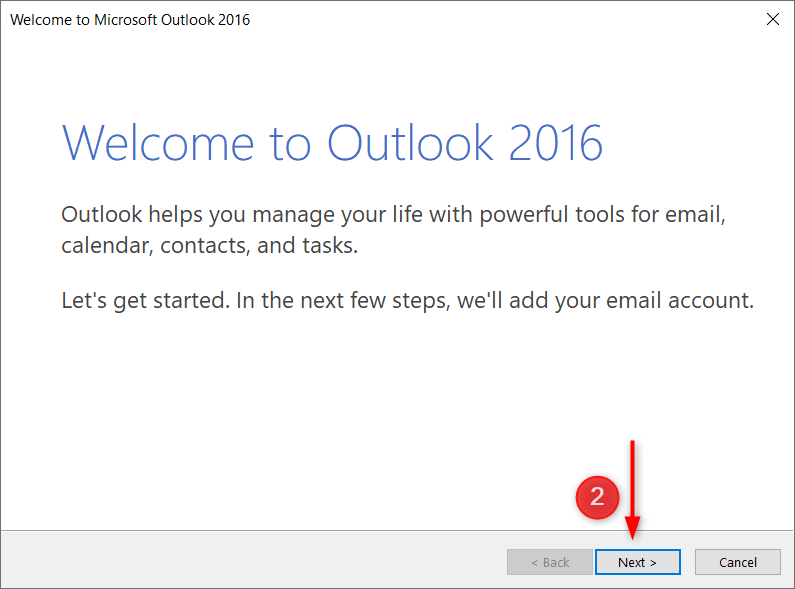
- If this is the first time you’ve opened Outlook, you’ll see a Welcome page. Click Next to get started.
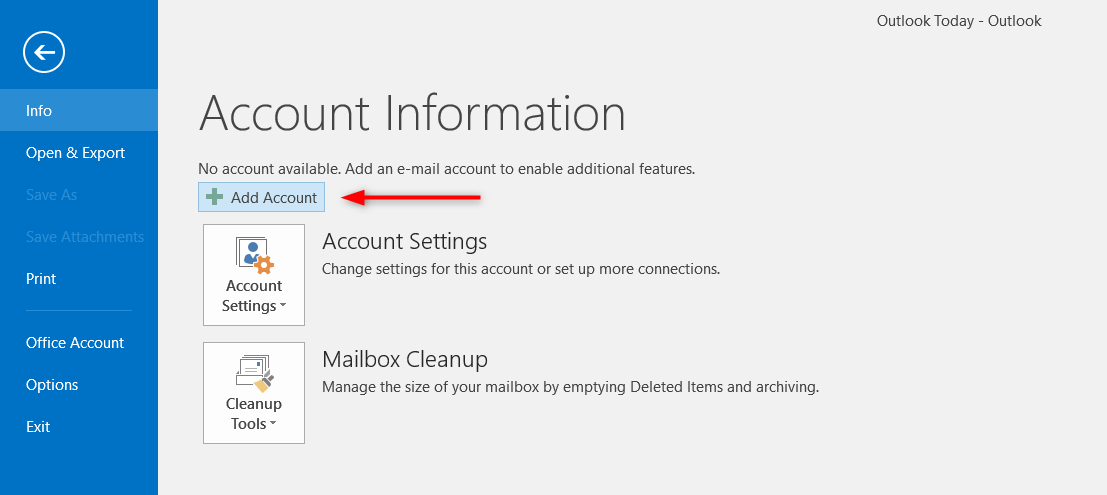
If you’ve used Outlook before, visit File > Add Account.
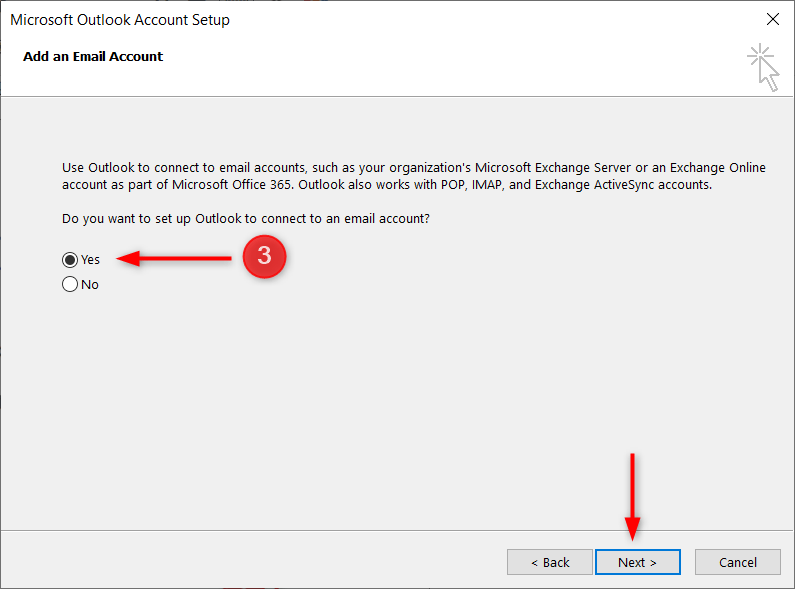
- Select Yes when prompted about setting up Outlook to connect to an email account and click Next.
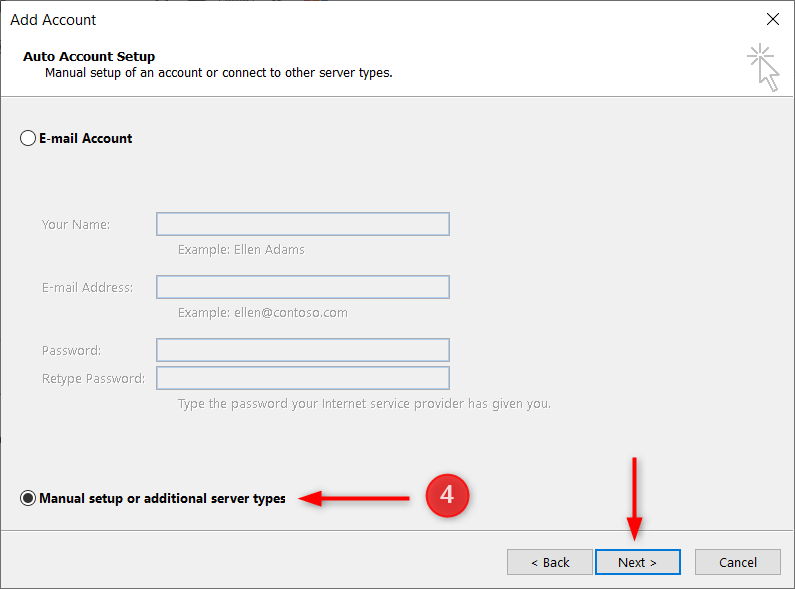
- Select Manual Setup or Additional Server Types and hit Next.
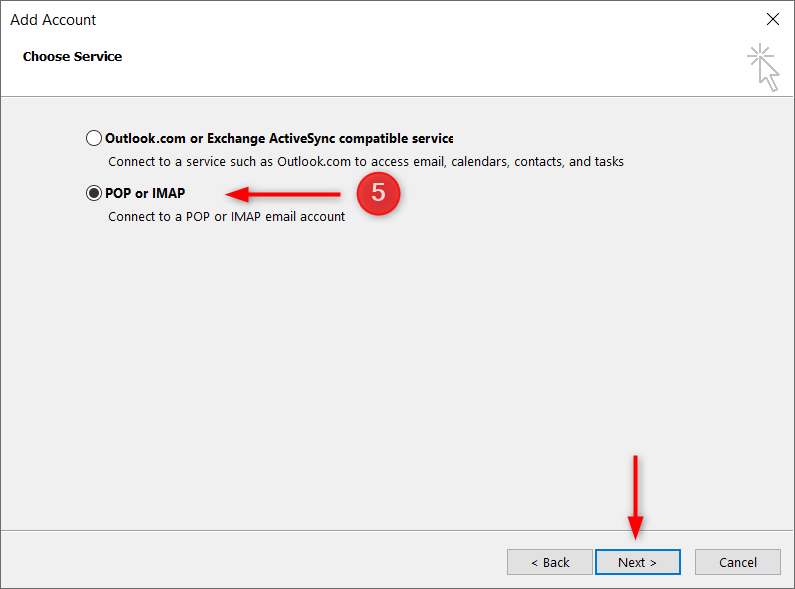
- Select POP or IMAP and click Next.
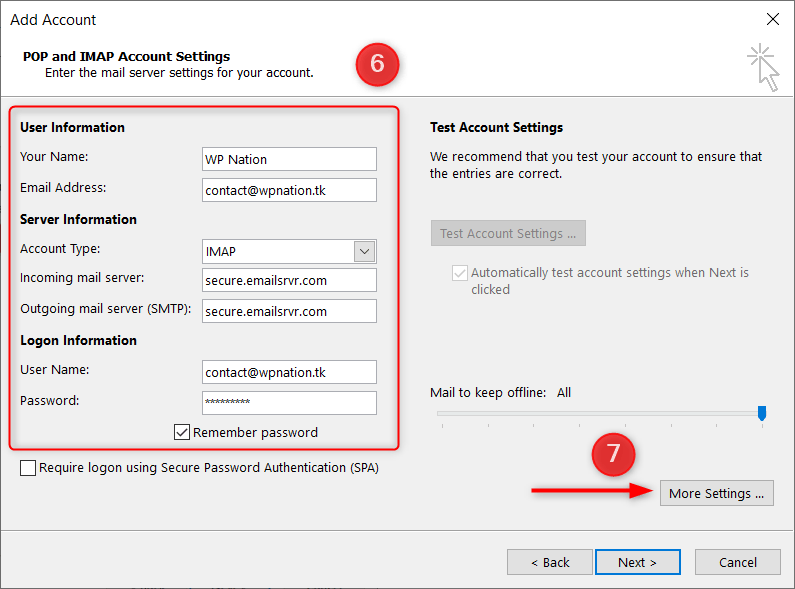
- In the Add Account window, enter the following information:
User Information
Your Name: Your Name or Business Name
Email Address: Your Rackspace Mailbox Email Address
Account Type: IMAP
Incoming Mail Server: secure.emailsrvr.com
Outgoing Mail Server: secure.emailsrvr.com
Logon Information
User Name: Your Rackspace Mailbox Email Address
Password: Your Rackspace Mailbox Password
- Once done, click More Settings.
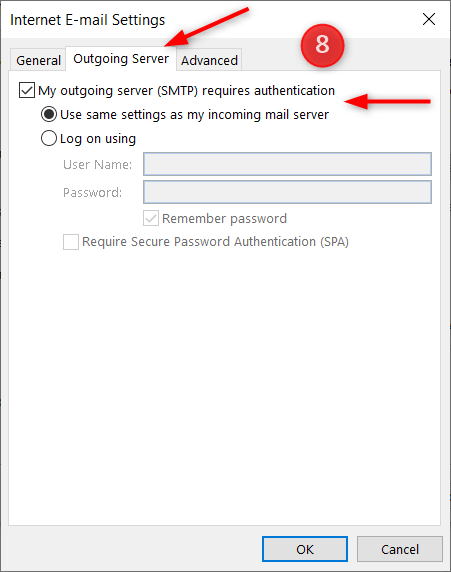
- Switch to Outgoing Server, check My Outgoing Server (SMTP) Requires Authentication, and select Use Same Settings as my Incoming Mail Server.
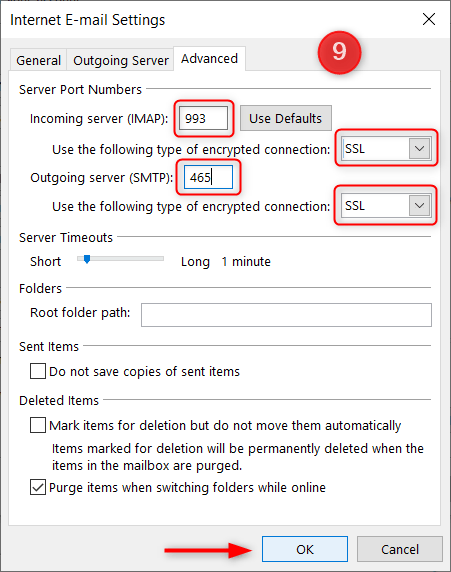
- Change Use the Following Type of Encrypted Connection to SSL for both the Incoming and Outgoing Servers. Next, change the Incoming Server (IMAP) port to 993, the Outgoing Server (SMTP) port to 465, and click OK.
- Click Next.
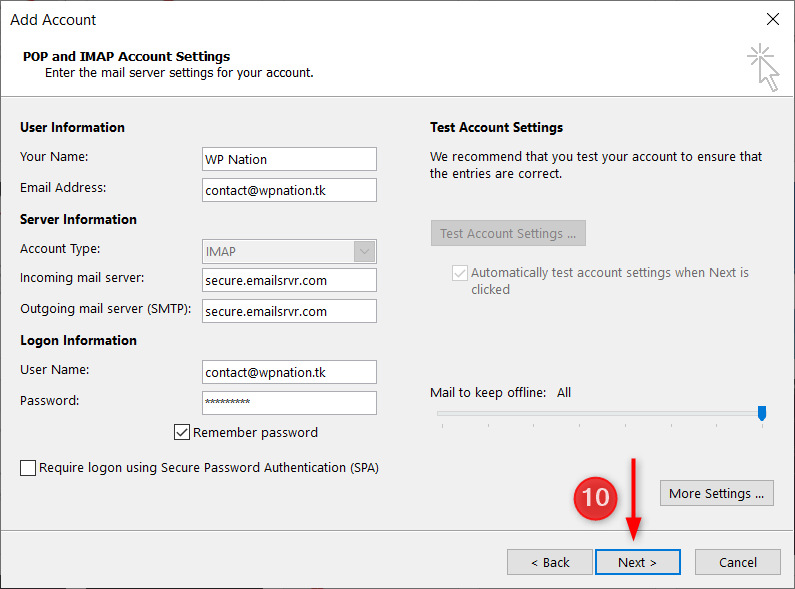
- Outlook will now attempt a small test by sending a text message using our configurations. If everything were configured correctly, the message would send out successfully. Click Close.
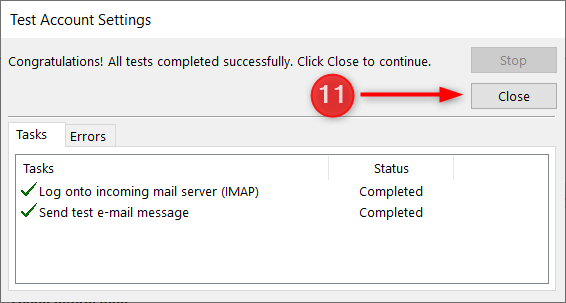
- Finally, click Finish to close the setup wizard.
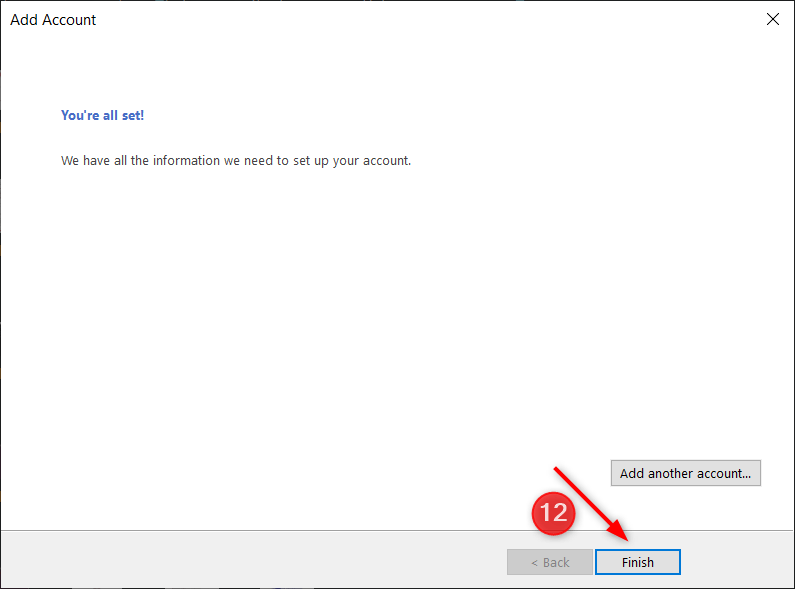
Congratulations! You have successfully configured your Rackspace mailbox with Microsoft Outlook. The syncing process between Outlook and your Rackspace mailbox may take some time based on the amount of email data to be fetched.
Mozilla Thunderbird
- Start by launching Thunderbird. If this is the first time you’ve opened the Thunderbird, you’ll see a welcome page prompting you to set up an existing email account.
Your Name: Your Name or Business Name
Email Address: Your Rackspace Mailbox Email Address
Password: Your Rackspace Mailbox Password
Once done, click Manual Config.
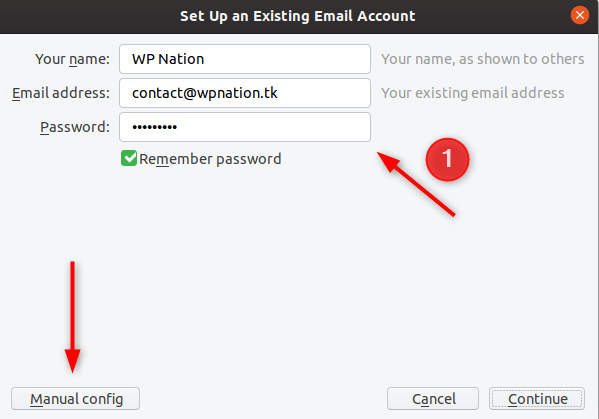
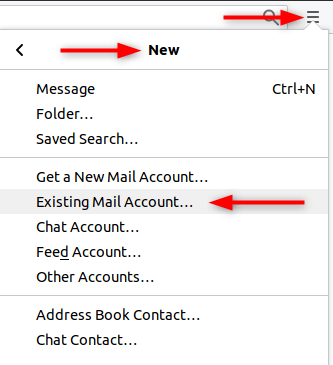
If you’ve used the Thunderbird before, visit Menu > New > Existing Mail Account.
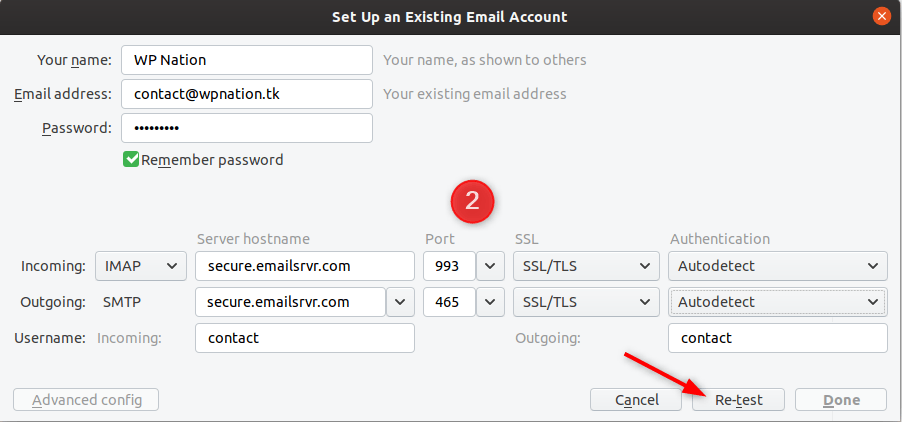
- In the current window, enter the following information to match the image below
Incoming
Email Protocol: IMAP
Server hostname: secure.emailsrvr.com
Port: 993
SSL: SSL/TLS
Authentication: Autodetect
Outgoing
Email Protocol: SMTP
Server hostname: secure.emailsrvr.com
Port: 465
SSL: SSL/TLS
Authentication: Autodetect
Once done, click Re-test.
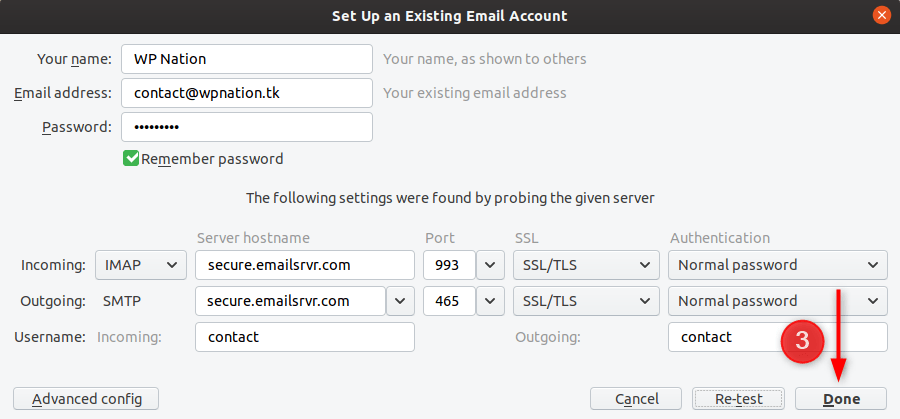
- Once testing is successful, you can click Done to finish the setup.
That’s it! You have now set up Mozilla Thunderbird to work with your Rackspace mailbox. The syncing process between Thunderbird and your Rackspace mailbox may take some time based on the amount of email data to be fetched.
iOS Mail
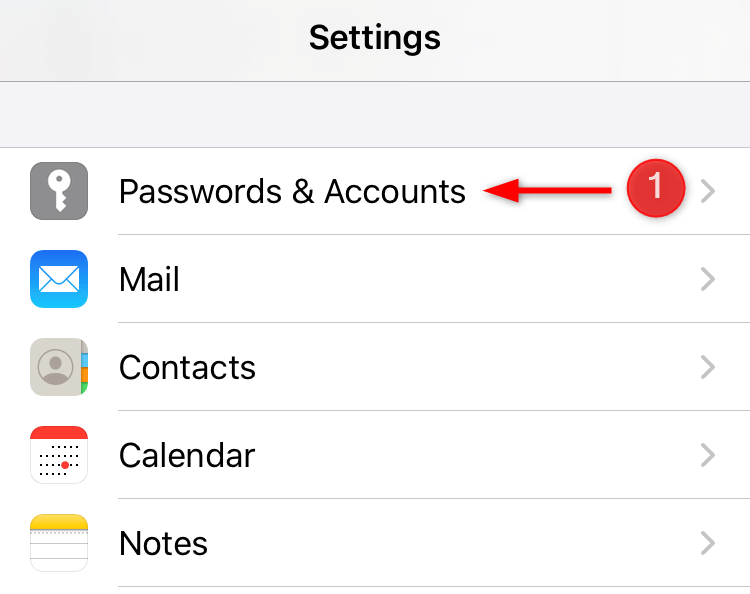
- Visit Settings and tap Passwords and Accounts. In this example, we are using the Mail app for iOS 13.
- Next, tap Add Account.
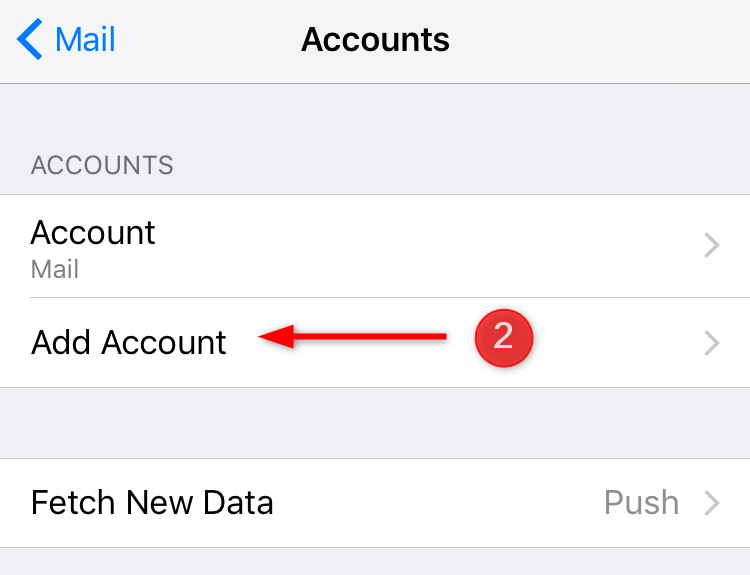
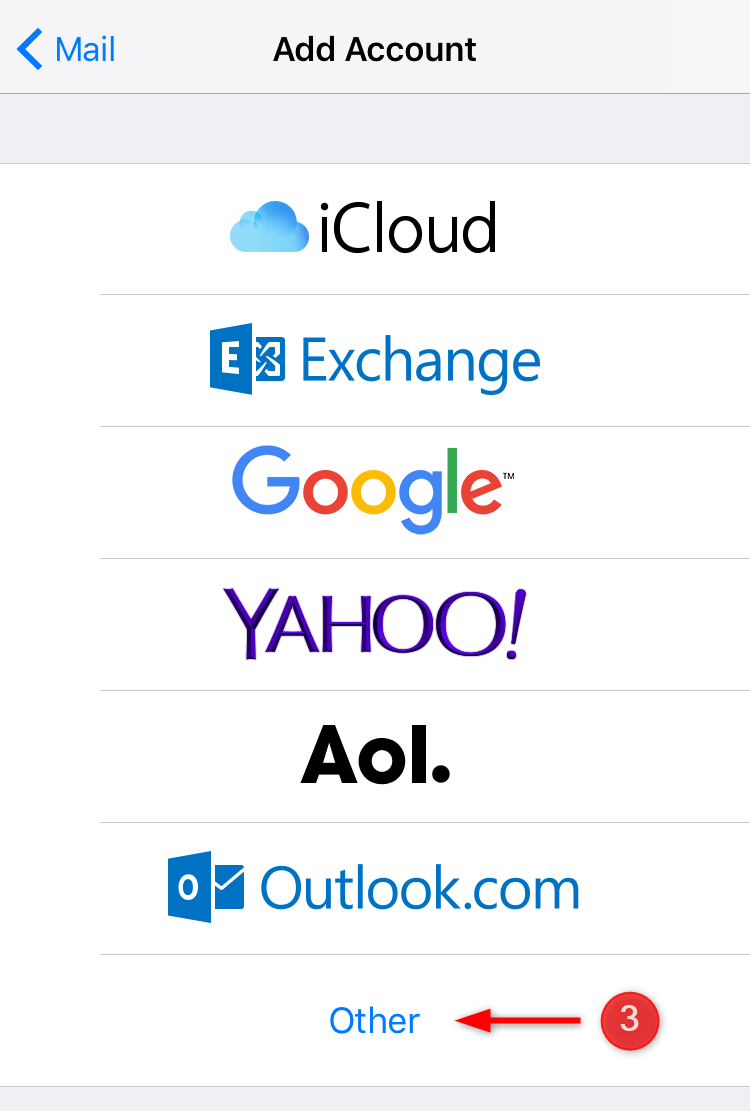
- Select Other at the bottom.
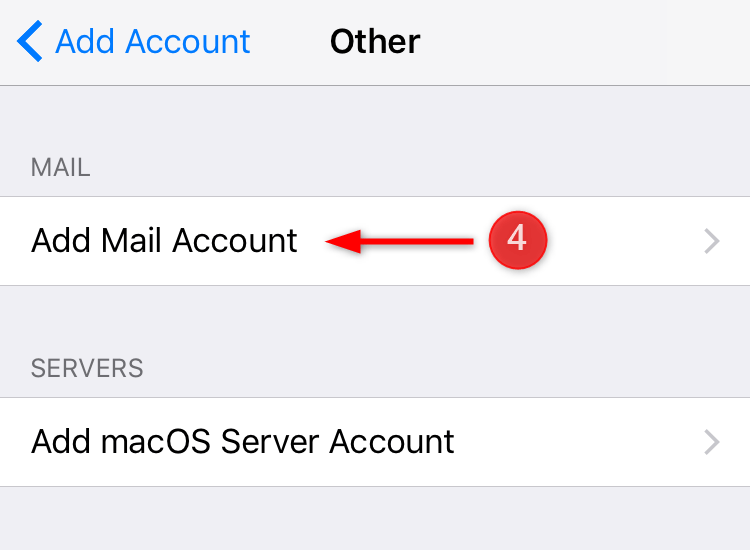
- Tap Add Mail Account.
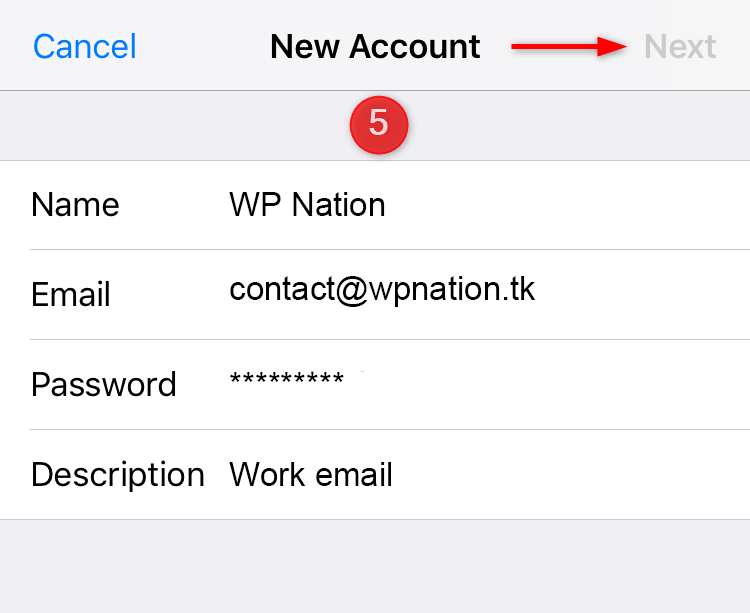
- In the next screen, enter the following information:
Name: Your Name or Business Name
Email Address: Your Rackspace Mailbox Email Address
Password: Your Rackspace Mailbox Password
Description: Anything you’d like!
Once done, click Next.
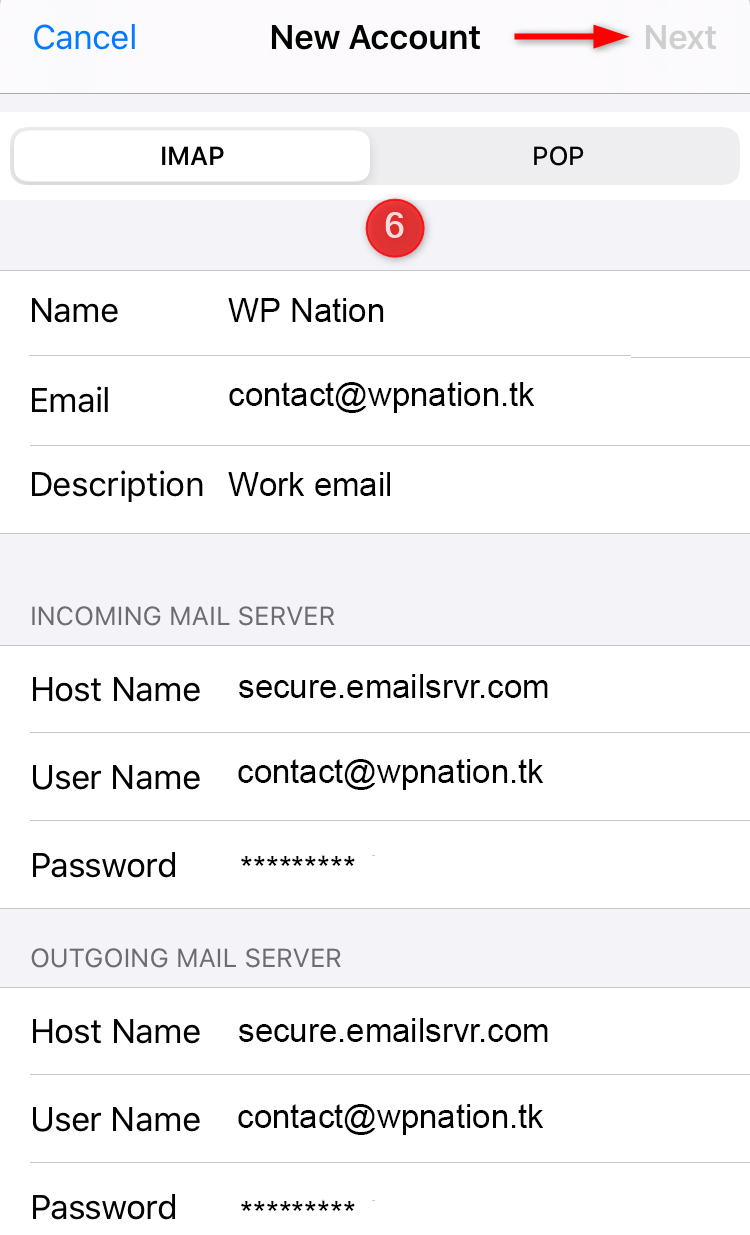
- Next, enter the following information; the previously entered information should already be prefilled from the last section.
Email Protocol: IMAP
Incoming Mail Server
Host Name: secure.emailsrvr.com
Username: Your Rackspace Mailbox Email Address
Password: Your Rackspace Mailbox Password
Outgoing Mail Server
Host Name: secure.emailsrvr.com
Username: Your Rackspace Mailbox Email Address
Password: Your Rackspace Mailbox Password
Once done, tap Next.
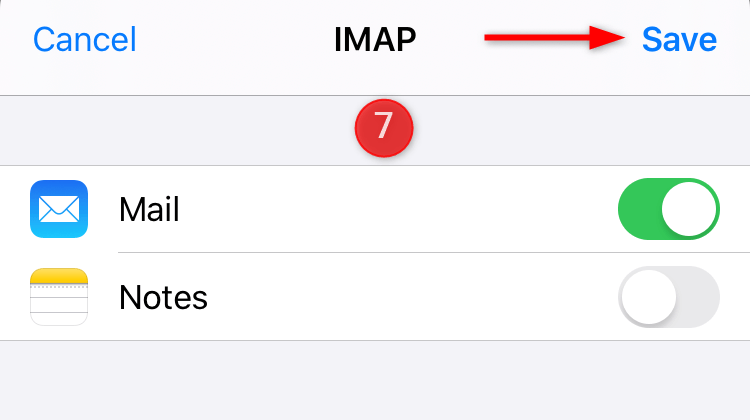
- On the next screen, you must ensure that the Mail feature is enabled and then hit Save to save your configurations.
Congratulations! You have successfully configured your Rackspace mailbox with the Mail application. The syncing process between the Mail client and your Rackspace mailbox may take some time based on the amount of email data to be fetched.